How to Build a Garden Trellis
What better way to create a natural privacy screen than a classy wood trellis covered by a flowering vine?
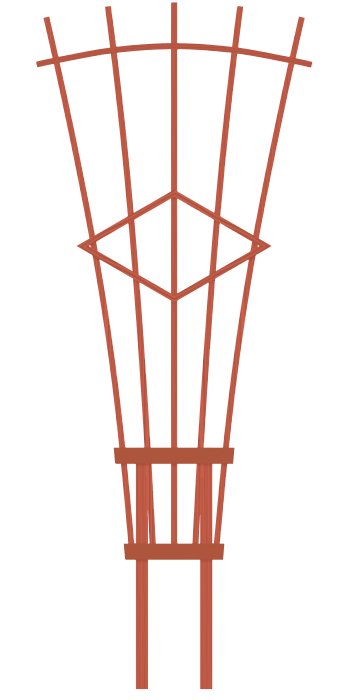
Trellises come in many shapes and sizes but few have withstood the test of time like the traditional fan trellis design.
This unique fan trellis features two legs that provide much more stability and strength during strong winds than single leg designs. The simple lines of this project will always be in style and it's simplicity makes building trellises an easy beginner's project.
Many vegetable plants as well as many flowering vines need a sturdy trellis for support. You can save a lot of space when you grow your cucumbers, peas, and beans with a trellis. Not only do trellises save space, they help keep the plants and vegetables off the ground. Not just vegetables, but many flowering plants grow best on a trellis. Some of the most beautiful flowering vines like Mandevilla, Clematis, Cardnial vines, and Morning Glories are much more attractive and manageable when grown on a trellis.
Materials You'll Need (All Materials are Decay Resistant Wood)
- Legs: 30 in. by 1 1/2 in. 2 3/4 in.
- Bottom Brace: 12 1/2" by 2 in. 1 3/4 in.
- Top Brace: 15 in. by 2 in. 1 3/4"
- Vertical: Stips: 60 in. by 3/4 in. 5 3/4 in.
- Diamond Segments: 14 in. by 3/4 in. 4 3/4 in.
- Arch: 33 in. by 1 in. 1 3/4"
Parts Drawings

Location of Notches fotr the Arch

Hole Layout Drawings for the Braces
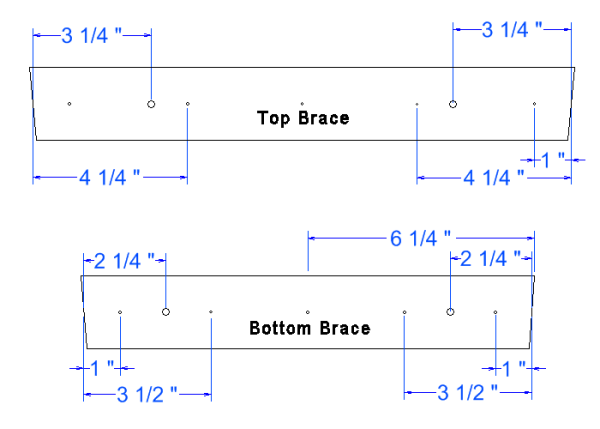
- Drill two 3/16 in. diameter holes in the Top Brace 3 1/4 in. from each end shown in the drawing above. These are for attaching the Top Brace to the legs with screws.
- Drill five 1/16 in. diameter holes in the Top Brace. These holes are 1 in. and 4 1/4 in. from each end plus one in the middle. These are for securing the Top Brace to the 60 in. Strips using 1 1/2 in. finishing nails.Bottom Brace: 12 1/2 in. by 2 in. 1 3/4 in.
- Drill two 3/16 in. diameter holes in the Bottom Brace 2 1/4 in. from each end as shown in the drawing above. These are for attaching the Bottom Brace to the legs with screws.
- Drill five 1/16 in. diameter holes in the Bottom Brace. These holes are 1 in. and 3 1/2 in. from each end plus one in the middle. These are for securing the Bottom Brace to the 60 in. Strips using 1 1/2 in. finishing nails.
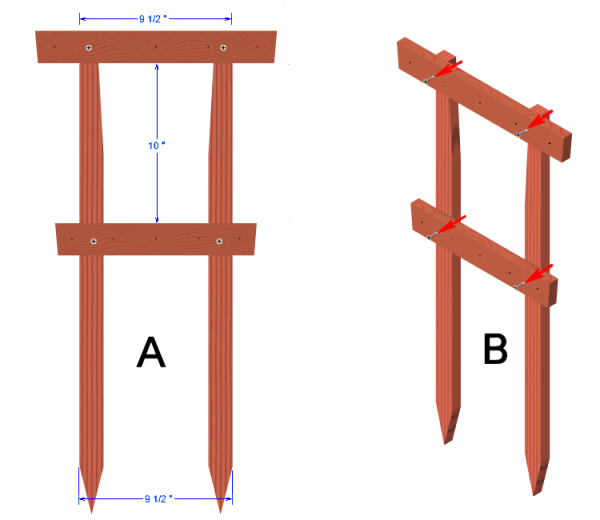
Attach the Braces to the Legs
-
Apply outdoor glue to mating surfaces and position the Braces and Legs as shown in drawing
A
above. -
Secure the Braces to the Legs with 1 1/2" screws as indicated by the red arrows in Drawing
B
above.
Attach the Five Strips to the Braces
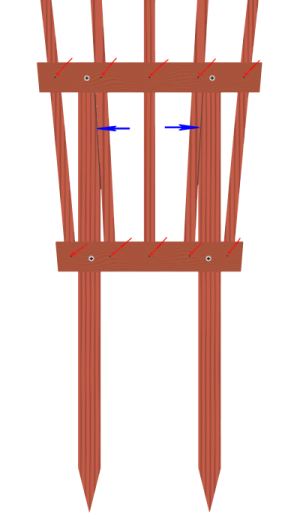
- Apply outdoor glue to mating surfaces and position the Strips under the Braces as shown in the drawing above. The bottoms of the Strips should be flush with the bottom of the Lower Brace.
- Note that the 2nd and 4th Strips are positioned against the Legs as indicated by the two blue arrows.
- Secure the Strips and Braces with 1 1/2 in. finishing nails as indicated by the ten small red arrows.
Attaching the Arch to the Five Strips

- Apply outdoor glue to mating surfaces and position the Arch and Strips as shown in the drawing above.
- Each Strip should be inside a notch and the Arch should be 7" from the top of each Strip.
- Secure the Arch to the Strips with 1 1/4" finishing nails as indicated by the five red arrows.
224Attach the Diamond Segments
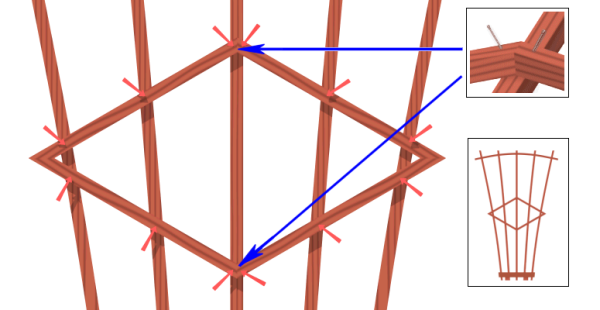
- Apply outdoor glue to mating surfaces and position the Diamond Segments on the Strips as shown in the drawing above. The Diamond should be centered between the Top Brace and the Arch.
- Secure the Diamond Segments to the Strips with 1 1/2" finishing nails as indicated by the red arrows.
- Note that the top and bottom ends of the Diamond Segments will require the nails to be driven in at an angle as indicated by the close up drawing. I recommend predrilling the holes through the Diamond Segemnts with a bit slightly smaller than the diameter of the finishing nails.
- Turn the assembled trellis over and ensure no nail or screw points are protruding through the wood surface. If so, either flatten the points with a hammer or file them flat with a file. The point of a nail or screw sticking through the surface can cause a small but painful cut.
Congratulations! Your Garden Trellis is complete!
Copyright Notice
We hope you enjoy the free woodworking plans offered on this site. You are invited to download or print any of the plans free of charge for your own use. Please be aware that the plans are copyrighted and may not be distributed by any person or company except here on www.bobsplans.com.
If you know a friend that would like a copy of any of our plans, please send him/her a link to our site so they can download them from here. We always welcome new visitors.
Please note that there is no PDF file for these Garden Trellis plans. You can either view these plans in your shop with your phone or mobile device or press the "Print These Plans" button below to print the plans on paper.
Building-Trellises.htm (12-31-2023)