 A Bookcase for Small Spaces
48" high, 24" wide, 12" deep
How to Build a Bookcase
Here is an easy to build small room bookcase. Most everyone owns books and needs a place to
display them. This bookcase will fill that need plus, it is easy to build and will add beauty
and functionality to your home
office. Even beginning woodworkers can build this project
with the free and easy to follow plans on this page. All you need are basic woodworking tools.
It's simple lines make it an easy project, even for novices.
Why get up and walk across the room when you can keep your books within arms reach with
this small but attractive bookcase? This bookcase is small enough to sit beside your easy chair.
Who knows, you may even want to use one shelf for a place to sit your coffee and your TV remote!
You can make this bookcase out of solid hardwood or use veneered plywood and trim the edges with
edge banding.The finished project is 48" high by 24" wide by 12" deep. Features four shelves,
with three of them being adjustable. Build this beautiful bookcase and you can turn
your collection of books into a library.
It's also designed to be a perfect compliment for our computer desk plans. Build both
projects and you'll be able to get your work done faster and have more time to enjoy life.
Bookcase Parts Drawings

The Bookcase Top is made of 3/4" solid wood. It is 24"
long by 12" wide.

The Bookcase Bottom is made of 3/4" solid wood or veneered plywood.
The Bottom is 21 1/2" by 10 3/4" wide.
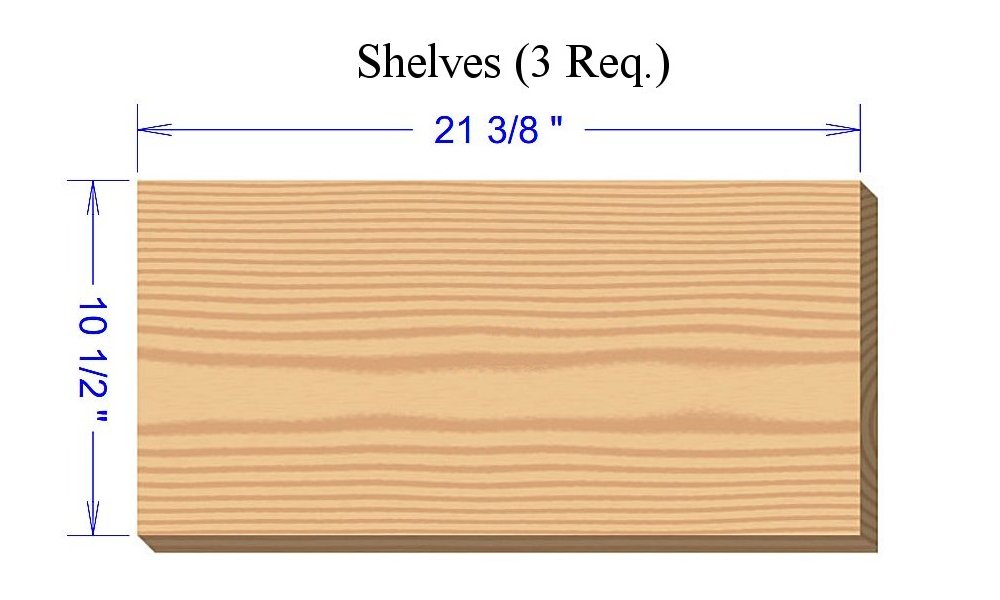
The Bookcase Shelves are made of 3/4" solid wood or veneered plywood.
The shelves are 21 3/8" long by 10 1/2" wide.

All of the Gussets are made of solid wood or veneered plywood. The four Side Gussets are 10" long by 2 1/4" wide.
The single Face Frame Gusset is 16" long by 1 1/2" wide.

The Rear Top Support is made of 3/4" solid wood or veneered plywood and
is 21 1/2" by 1 1/4".

The Rear Bottom Support is made of 3/4" solid wood or veneered plywood and
is 21 1/2" by 2 1/4".

All the Face Frame parts are made of solid wood. The Face Frame Top is 20 1/2" long
by 1 1/4" wide.

The Face Frame Bottom is 20 1/2" long by 3" wide.
Note that the Face Frame Bottom needs to have a portion of wood removed to give it
a more decorative look. This is shown in the image below.

Using your jig saw, remove a section of wood from the Bottom Face Frame as shown
above. This will give the appearance of the Bookcase having legs instead of a
simple square bottom.

The Bookcase Side Panels are made of 3/4" solid wood or veneered plywood. They are 47 1/4"
long by 11" wide.

The Face Frame Sides are made of 3/4" solid wood. They are 47 1/4"
long by 1 1/4" wide.

The Back Panel is made of 1/4" veneered plywood. It is 47 1/4" Long by 22 1/4" wide.
Cutting the Rabbet on the Sides

Using your your table saw or an appropriate size rabbet bit in your router, remove a
section of wood from each Side as indicated by the green arrow above. This is needed
so the Back Panel can fit flush with the rear edges of the bookcase sides.
Hole Layout Drawings
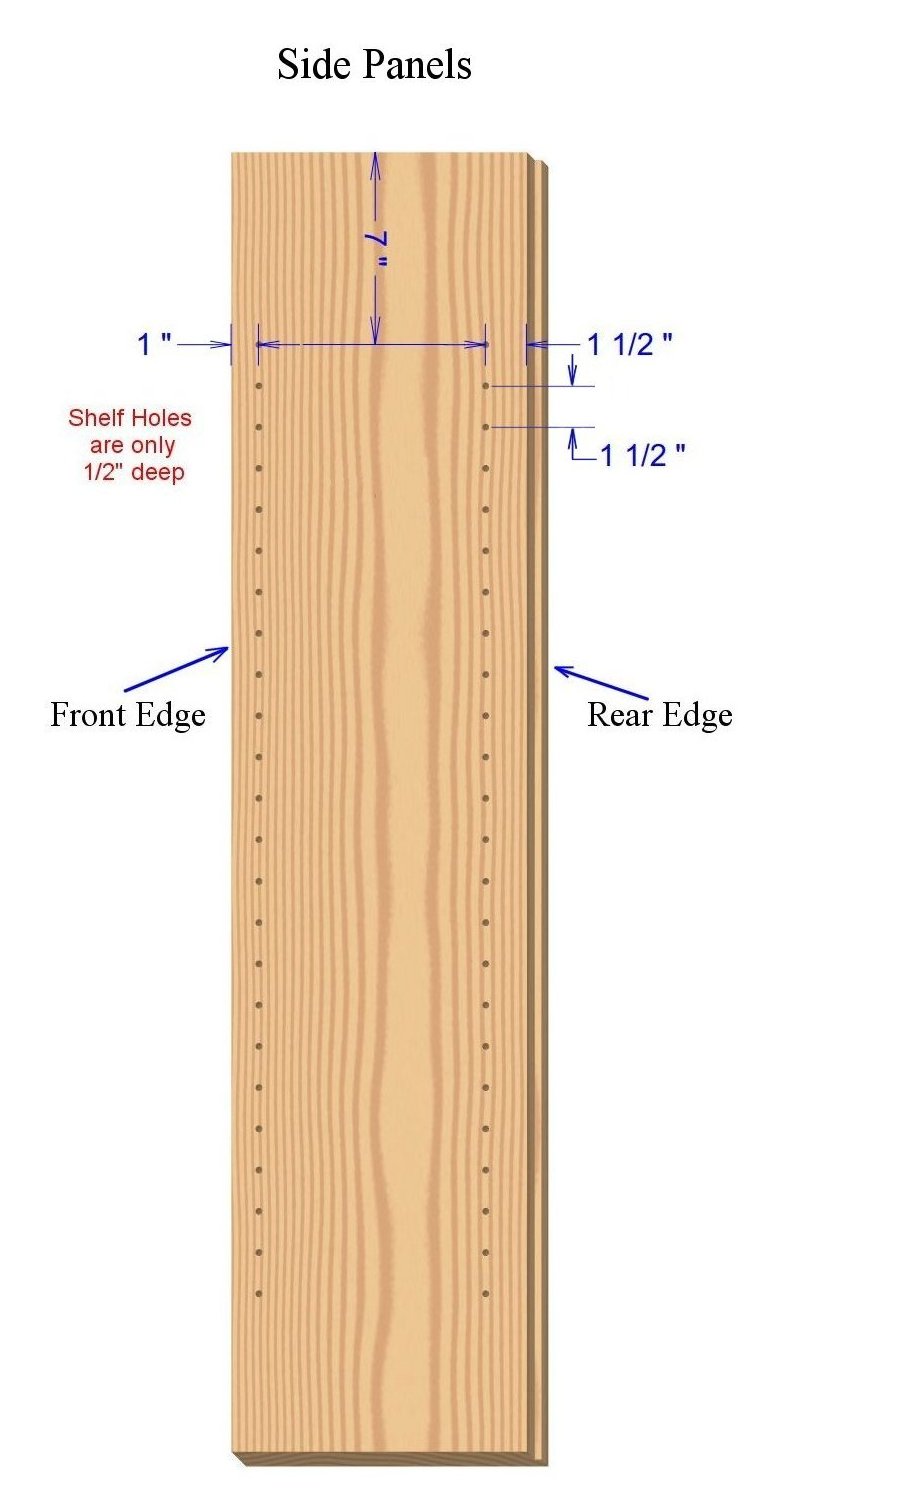
Drill 1/4" diameter holes 1 1/2" apart and only 1/2" deep
on the inside surface of the Side Panels for the shelf support pegs as shown above.
Be extremely careful that you don't
drill through the outer surface of the sides.

Drill the back panel mounting holes with a 5/32" bit as shown above. These holes are 3/16"
from the edges. Note that the hole layout is the same on both sides and also the same on the
top and bottom of the Back Panel.
A Note About Pocket Holes
Our Bookcase plans, as well as many of our other plans, use pocket hole joinery as
a way to join work pieces. Pocket holes are especially useful when joining the
end of one work piece to the edge of another work piece. Alternatives to pocket
holes would be dowel joints or tenon joints.
But both dowel joints and tenon joints are more work and more time consuming.
Pocket holes, on the other hand, are a much, much easier way to join wood. Pocket
holes only require the holes be drilled in one of the work pieces and it's
not even critical that the holes be precisely located. You still
need to clamp the workpieces so they cannot move, but the dowel screws do not
require a hole in the second work piece.
If you're not experienced with pocket hole joinery, I strongly recommend
you view the following video from Woodworker's Journal and you'll see why we
use pocket holes in so many of our projects. Other other good videos
about pocket hole usage are out there too. Just do a Google search for
pocket hole joinery and you'll find several. You may want to practice
making a few joints on some scrap wood before starting with the real work
pieces.
Pocket Hole Jig Video from Woodworker's Journal

Drill two pocket holes on each end of the back side of the Face Frame Bottom. These pocket
holes should be about 1/2" from the top and 1/2" from the bottom.
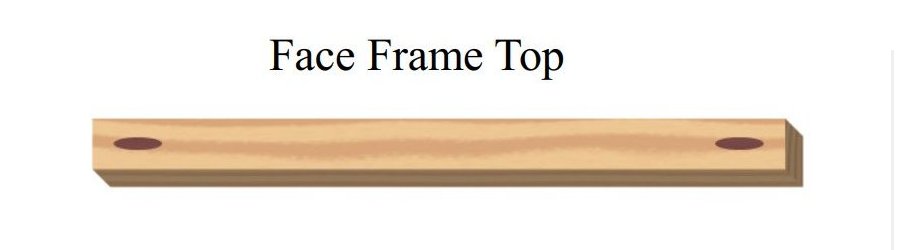
Drill one pocket hole on each end of the back side of the Face Frame Top. These holes
should be centered between the edges of the work piece as pictured above.

The Rear Bottom Support requires pocket holes on both the front and back sides.
First, drill two pocket holes on each end of one side of the Rear Botton Support
as pictured above. These holes will be used to attach the rear Botton Support
to the Side Panels.

Next, drill two pocket holes on the opposite side of the Rear Bottom Support as
pictured above. These pocket holes should be about 4" from each end.
These holes will be used to attach
the Bottom during the assembly.

The Rear Top Support requires pocket holes on one surface and regular holes through
edges. First, drill two pocket holes on the wide surface of the Rear Top Support
as shown above. These holes are used to attach the Rear Top Support to the Side
Panels.

Next, drill three 3/16" diameter holes through the edge of the Rear Top Support
as shown above, (indicated by the green arrows). The middle hole should be
approximately centered between the ends. These holes are used to secure the Top to
the Rear Top Support.
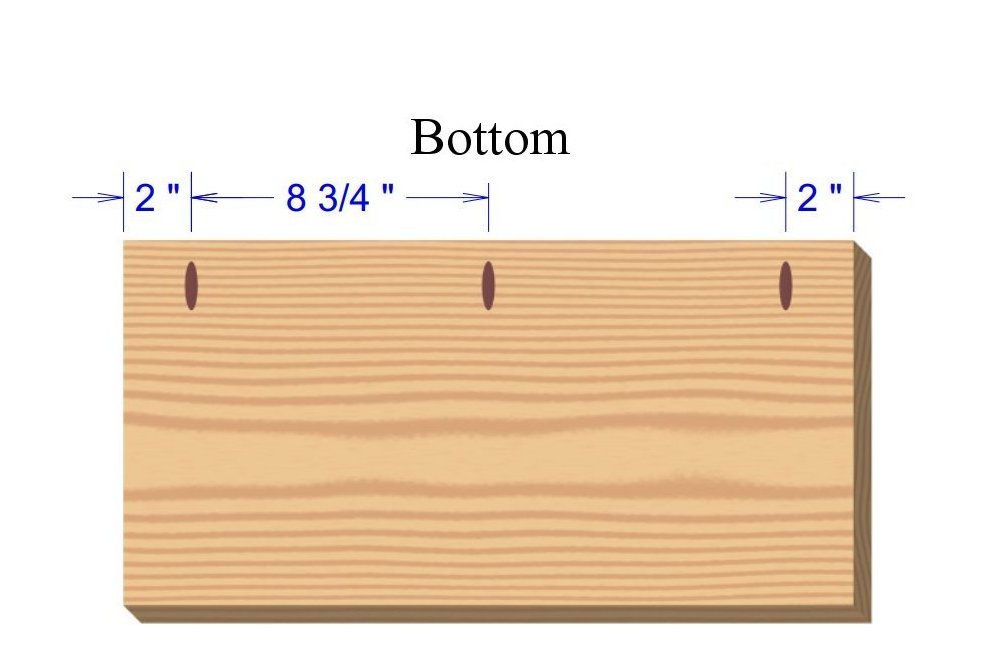
Drill three pocket holes on the underside of the Bottom as shown above. These holes
will be used to attach the Front Face Frame to the Bottom.

First, drill two 3/16"holes through the surface of each Side Gusset as indicated by
the green arrow above. These holes should be 1 3/4" from each end and centered
from top to bottom. Next, drill a pocket hole about 1 1/4" from each end and oriented
toward the top edge as indicated by the blue arrow in the image above.
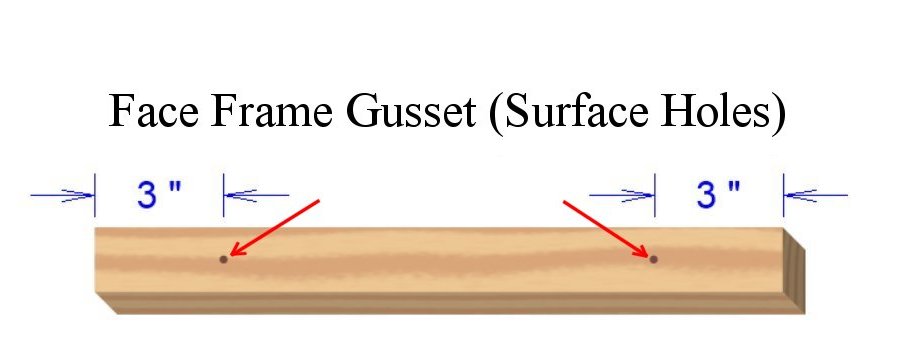
Drill two 3/16 in. Diameter holes through the surface of the Face Frame
Gusset as shown above. These holes are 3" from each end and centered
between the edges.

Next, drill three 3/16 in. Diameter holes through the edge of the
Face Frame Gusset as shown above. These holes are 2" from each end, one
in the center, and between the edges.
Bookcase Assembly Instructions
Attach Top and Bottom Gussets to the Right Side Panel.

Attach a Gusset to the bottom of the Right Side Panel with 1 1/4"
#8 pan head wood screws as pictured above, (indicated by the blue arrow).
Be sure the end of the gusset is flush with the front edge of the Side Panel
and the bottom of the Gusset is flush with the bottom of the Side Panel as
indicated by the red arrow.
The bottom Gussets are used to attach the Bookcase Bottom in a later step.
Next, attach a Gusset to the top of the Right Side Panel with 1 1/4" pocket hole screws
as indicated by the green arrows. As with the bottom Gusset, be sure the end of the
top Gusset is flush with the front edge of the Side Panel
and the top of the Gusset is flush with the top of the Side Panel.
Attach the Top and Bottom Gussets to the Left Side Panel.

As with the Right Side Panel, attach a Gusset to the bottom of the Left Side Panel with 1 1/4"
#8 pan head wood screws as pictured above.
Again, be sure the end of the Gusset is flush with the
front edge of the Side Panel and the bottom of the Gusset is flush with the
bottom of the Side Panel as indicated by the red arrow.
Next, attach a Gusset to the top of the Right Side Panel with 1 1/4" pocket hole screws
as with the Left Side Panel. As with the bottom Gusset, be sure the end of the
top Gusset is flush with the front edge of the Side Panel
and the top of the Gusset is flush with the top of the Side Panel.
Attach the Rear Top and Rear Bottom Supports
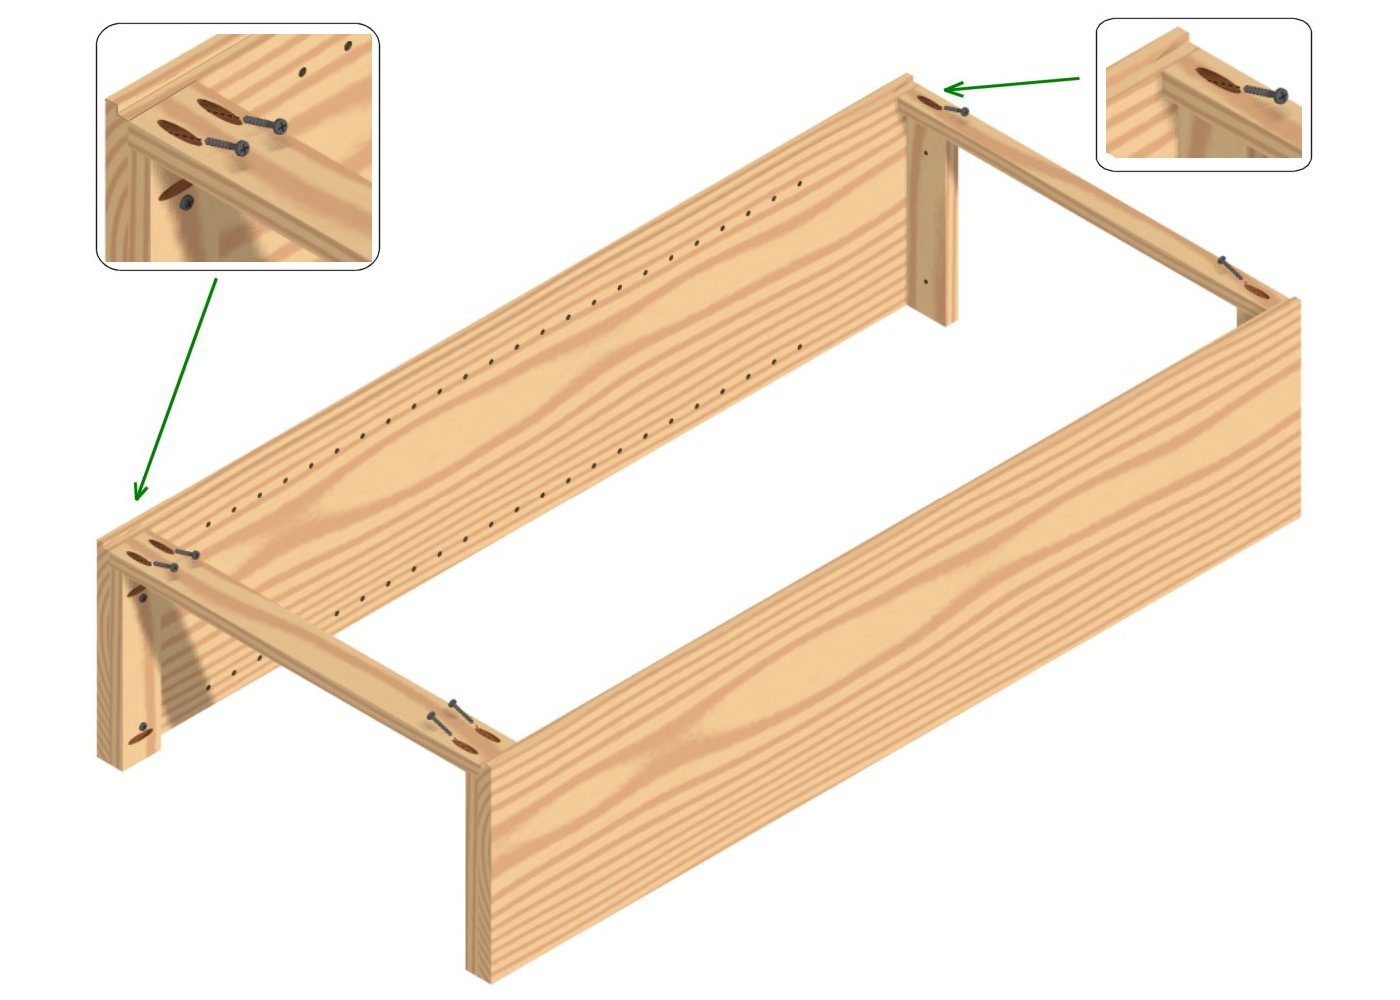
Attach the Rear Top Support and the Rear Bottom Support to the Side Panels with
1 1/4" pocket hole screws as shown above.
Both the Rear Top Support and the Rear Bottom Support must be flush with the
inner surface of the rabbet. This is because the Back Panel is attached to
these supports and the surface of the rabbet.
Attach the Bottom to the Side Gussets and Rear Bottom Support

Turn the assembly over so the Rear Top Support and Rear Bottom Support
are facing down. Then, position the Bottom so it is flush with the front edges of the Side Panels and
that the ends of the Bottom are flush with the inner surface of each Side Panel.
Secure the Bookcase Bottom to the bottom Gussets and Rear Bottom Support with 1 1/4" pocket
hole screws as indicated by the green arrows in the image above.
Note that the three pocket holes in the Bookcase Bottom will be used to attach
the Front Face Frame in a later step.
Attach the Top to the Side Gussets and Rear Top Support

Position the Bookcase Top against the Top Gussets so it is centered from side to
side as shown in the image above.
Secure the Top to both Top Gussets with 1 1/4" pocket hole screws as
indicated by the green arrows in the image above.
Next, secure the Top to the Rear Top Support with 1 3/4" pan head screws,
also indicated by the green arrows in the image above..
Assembling the Face Frame

Assemble the Face Frame with pocket hole screws as shown above. Check to make sure
the assembled frame is square. If not, clamp it in a squared position
before tightening the screws.
Attach the Gusset to the Face Frame
Attach the Face Frame Gusset to the Face Frame Top with 2" pan head screws as shown above.
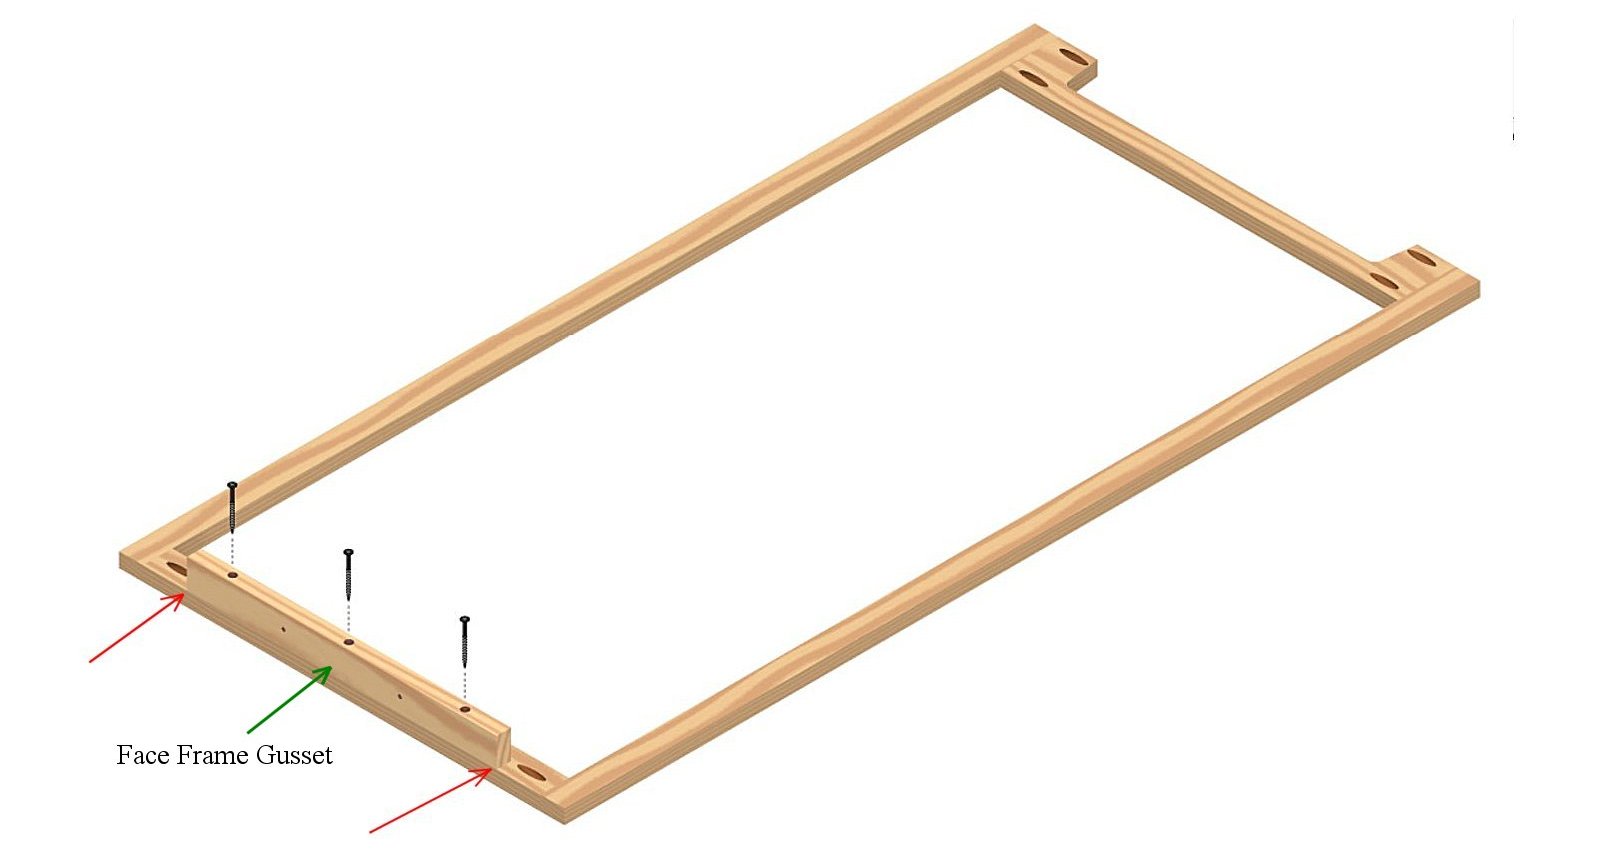
Attach Face Frame to the Top, Sides, and Bottom of the Bookcase.

Position the top of the face frame so it is flush with the bookcase top and
centered from side to side.
Secure the top of the face frame to the bookcase top with two 1 1/4"
screws through the face frame gusset as indicated by the red arrows above.
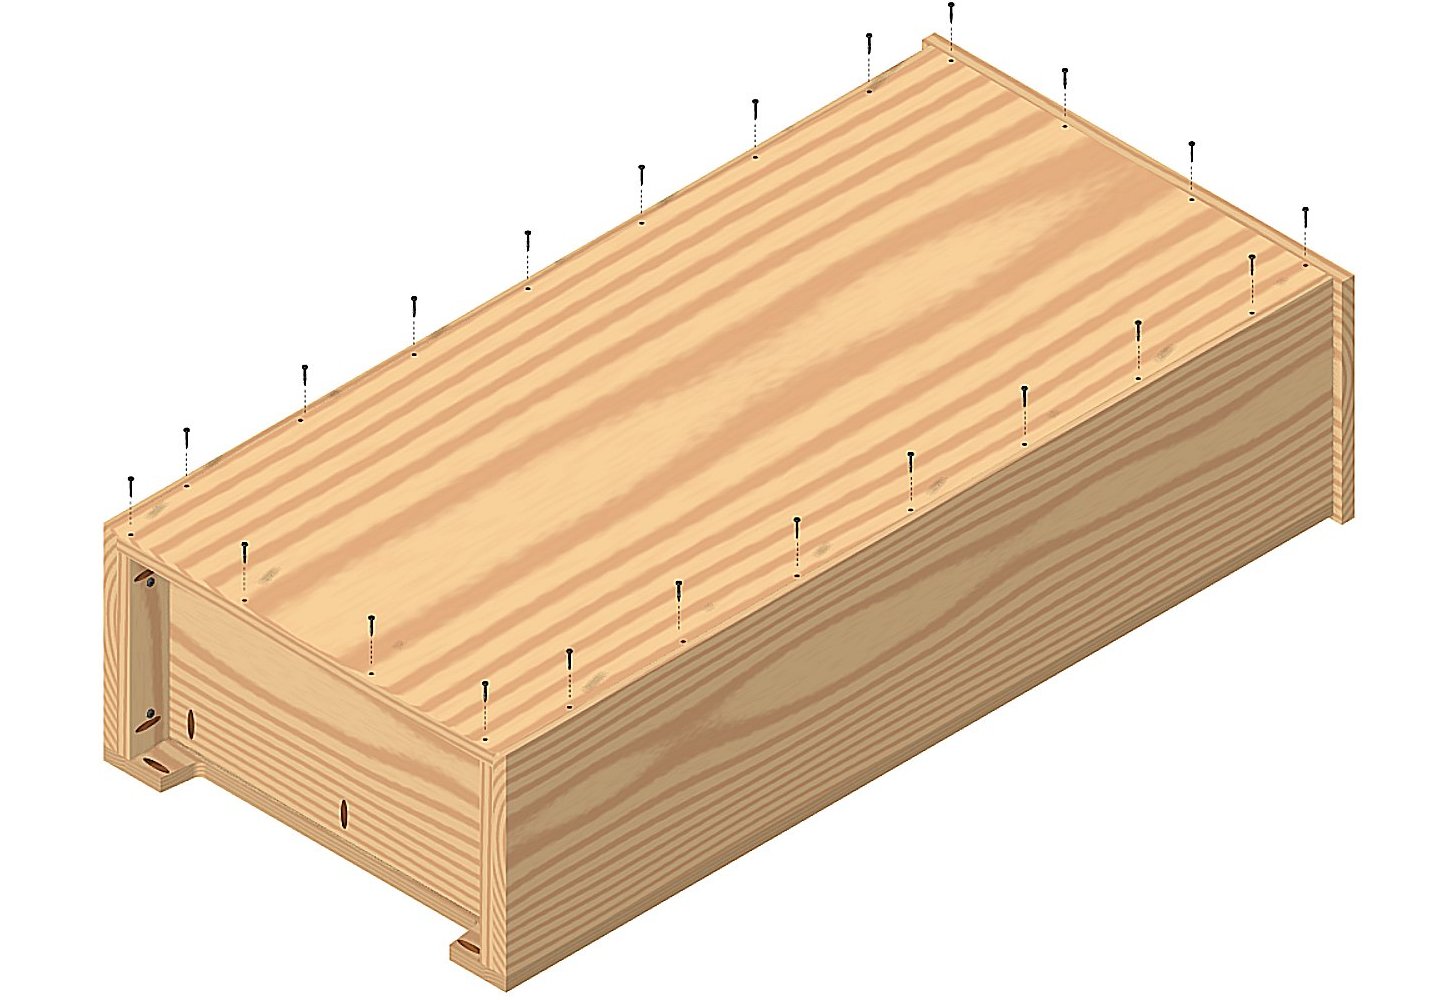
Secure the sides of the face frame to the bookcase sides with 1 1/2" finishing
nails as indicated by the green arrows above.
Personally, I thinks it is a good idea to predrill the nail holes in the
Face Frame with a bit slightly smaller than the nail diameter. This helps
ensure the nails go straight through the wood.
Secure the bottom of the Face Frame to the Bookcase Bottom with three 1 1/4" pocket hole
screws using the pocket holes already drilled in the Bottom as indicated by the
blue arrows above.
Using a nail set, countersink the finishing nails so they are below the
surface of the wood and fill the holes with appropriately colored wood putty.
Attach the Back Panel to the Bookcase
Position the Back Panel so it is inside the rabbet cutouts on the bookcase
Side Panels and flush with the underside of the Top.
Secure the Back Panel with 3/4" #6 pan head wood screws as shown above.
Insert the Shelf Pegs

Insert the shelf pegs in the 1/4" diameter holes on each Side Panel
at the necessary distance apart for each shelf position.
Be sure the four shelf pins for each shelf are all an equal distance
from the top or from the shelf above.
Insert the Shelves

Place the shelves on the shelf support pegs as shown above. Note
that since the shelves are wider than the Face Frame opening
you will need to tilt the shelves sideways as you insert
them.
Congratulations! Your Bookcase is Completed.
Tools and Materials Needed
Tools You'll Need
- Table Saw
- Electric Drill
- Pocket Hole Jig
- Woodworking Router
- Sander
- Screwdrivers
Hardware You'll Need
- Shelf Support Pegs (1/4” pin diameter)
- 1 1/4” Pocket Hole Screws
- 1 1/4” #8 Pan Head Wood Screws
- 1 3/4" #8 Pan Head Wood Screws
- 3/4” #6 Pan Head Wood Screws
- 1 1/2” Finishing Nails
Parts List for this Bookcase
| Item Name |
Size |
Material |
Qty |
| Top |
24” by 12” |
3/4” Solid Wood |
1 |
| Shelves |
21 3/8” by 10 1/2" |
3/4” Wood or Plywood |
3 |
| Bottom |
21 1/2” by 10 3/4” |
3/4” Wood or Plywood |
1 |
| Side Panels |
47 1/4” by 11” |
3/4" Wood or Plywood |
2 |
| Side Gussets |
10" by 2 1/4” |
3/4" Wood or Plywood |
4 |
| Face Frame Gusset |
16" by 1 1/2” |
3/4" Wood or Plywood |
1 |
| Rear Top Support |
21 1/2” by 1 1/4” |
3/4" Wood or Plywood |
1 |
| Rear Bottom Support |
21 1/2” by 2 1/4” |
3/4" Wood |
1 |
| Face Frame Top |
20 1/2” by 1 1/4” |
3/4" Wood |
1 |
| Face Frame Bottom |
20 1/2” by 3” |
3/4" Wood |
1 |
| Face Frame Sides |
47 1/4” by 1 1/4” |
3/4” Wood |
2 |
| Back |
47 1/4” by 22 1/4” |
1/4" Plywood |
1 |
We hope you enjoy the free woodworking plans offered on this site. You are invited to
download or print any of the plans free of charge for your own use. Please be aware
that the plans are copyrighted and may not be distributed by any person or company
except here on www.bobsplans.com.
If you know a friend that would like a copy of any of our plans, please send him/her a
link to our site so they can download them from here. We always welcome new visitors.
Please note that there is no PDF file for these Bookcase plans. You can either view
these plans in your shop with your phone or mobile device or print a paper copy of
this web page with your printer.
Copyright © 2021 by Robert E. Reedy (All Rights Reserved)
Bookcase.htm (12-30-2023)